
In this post I will continue discussing the custom pattern process I started on the last post and explain our process in obtaining the pattern seen below.

After having established the pattern we desired as per my last post, we have to now input all those numbers, or as Revit calls them, the pattern descriptors on a .pat file in order for Revit to read it as a pattern. Finding the .pat file that comes with Revit is a task on it's own so I have provided our .pat file below.
Download
After you download the .pat provided, open it and when or if prompted do so with notepad, not word. The following notepad document should open:
The only text that can be change are the ones highlighted. The rest must remain as is or the file will not be read by Revit.
The first line is the name of the pattern with a * at the beginning of the name. This can be change to reflect the pattern type. In our case it's a custom tile pattern.
The second line is left blank on purpose.
The third line must be typed as shown ;%TYPE=MODEL
The fourth line is blank.
Once the .pat file has been set with the pattern desired, save it.
In Revit create a new material. This is located under the manage tab, Materials.
Create a duplicate of an existing material. I usually use a material that resembles the one I want to create. See image below.

Click OK.
To the right are the surface pattern and cut pattern types. To add the new surface pattern click the 3 dots to the right of it. That opens the window below.

There are two types of patterns, a drafting pattern and a model pattern. Make sure that the model type is checked, otherwise Revit won't read the file type.
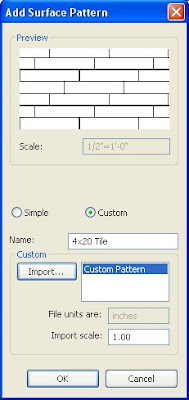
Click to check 'custom' and click on the import button. Locate the .pat file you've saved and click OK on all the remaining open windows until all windows are closed.
Download
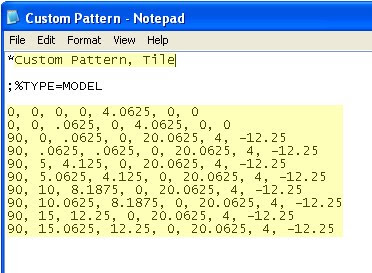
After you download the .pat provided, open it and when or if prompted do so with notepad, not word. The following notepad document should open:

The only text that can be change are the ones highlighted. The rest must remain as is or the file will not be read by Revit.
The first line is the name of the pattern with a * at the beginning of the name. This can be change to reflect the pattern type. In our case it's a custom tile pattern.
The second line is left blank on purpose.
The third line must be typed as shown ;%TYPE=MODEL
The fourth line is blank.
From the fifth line down are the pattern descriptors. These are what tells Revit what to do and how to create the pattern. See my previous post on how these numbers work.
Once the .pat file has been set with the pattern desired, save it.
In Revit create a new material. This is located under the manage tab, Materials.
Create a duplicate of an existing material. I usually use a material that resembles the one I want to create. See image below.

Click OK.
To the right are the surface pattern and cut pattern types. To add the new surface pattern click the 3 dots to the right of it. That opens the window below.

There are two types of patterns, a drafting pattern and a model pattern. Make sure that the model type is checked, otherwise Revit won't read the file type.
Click new and the following window will open.

Click to check 'custom' and click on the import button. Locate the .pat file you've saved and click OK on all the remaining open windows until all windows are closed.
Once all these steps have been completed, just add the material to the desired wall or object and your done.
If you have any questions or comments, please let me know.

This is a very helpful guide for creating custom patterns in Revit.
ReplyDelete